2.1. Tips/Issues for installation
2.1.1. Linux installation
For Linux installation, only Ubuntu operating system are currently being tested. In particular, one needs to make sure that the QT environment can be used. Running the following command should be sufficient to start with:
sudo apt install libxkbcommon-x11-0 libxcb-icccm4 libxcb-image0 libxcb-keysyms1 libxcb-randr0 libxcb-render-util0 libxcb-xinerama0 libxcb-xfixes0 x11-utils libgl1 libegl1
It is also necessary to give some reading and writing permission access to some specific folders. In particular, PyMoDAQ creates two folders that are used to store configurations files, one assigned to the system in /etc/.pymodaq/ and one assigned to the user ~/.pymodaq/. We need to give reading/writing permission acess to the system folder. One should then run before/after installing pymodaq:
sudo mkdir /etc/.pymodaq/sudo chmod uo+rw /etc/.pymodaq
As a side note, these files are shared between different pymodaq’s versions (going from 3 to 4 for example). It is suggested to delete/remake the folder (or empty its content) when setting up a new environment with a different pymodaq version.
2.1.2. Qt backend
PyMoDAQ source code uses a python package called qtpy that add an abstraction layer between PyMoDAQ’s code and the actual Qt python implementation (either PyQt6 or PySide6, but also PyQt5). Qtpy will look on what is installed on your environment and load PyQt5 by default (see the PyMoDAQ configuration for default values to change this default behaviour). This means you have to install one of these backends on your environment using either:
pip install pyqt6pip install pyside6pip install pyqt5
2.1.3. Loading modules
During its installation, a few scripts have been installed within your environment directory, this means you can start PyMoDAQ’s main functionalities directly writing in your console either:
dashboarddaq_scandaq_loggerdaq_viewerdaq_moveh5browserplugin_manager
This is allowed thanks to the following lines of code of the pyproject.toml file:
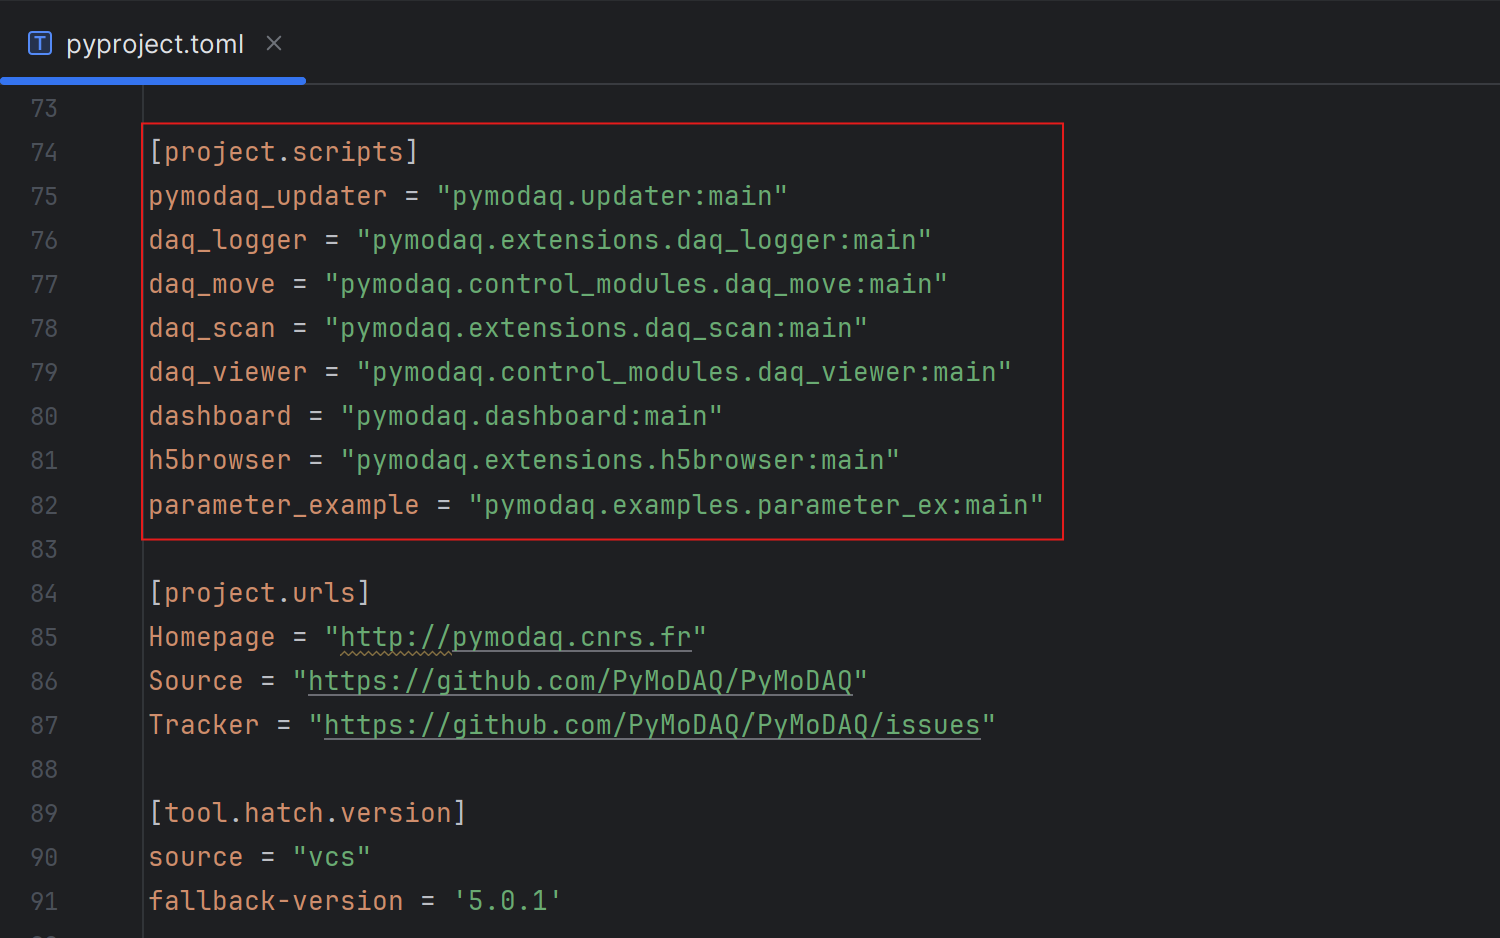
Fig. 2.1 Caption of the pyproject.toml file. The red box contains the part that makes possible the execution of a given Python file by using your console.
The Fig. 2.1 shows the script which allows you to launch PyMoDAQ’s main modules.
In orange we have the file name and in green between "" the path of the file followed by :main.
In fact, [Project.scripts] can execute any function (replace main by the name of the other function) but main
is the function that launches the module.
Most PyMoDAQ’s modules are Python files with an entry point so each of them can be launched directly with your console. For PyModDAQ’s main modules, you can also run them by entering the following commands:
python -m pymodaq.dashboardpython -m pymodaq.extensions.daq_scanpython -m pymodaq.extensions.daq_loggerpython -m pymodaq.control_modules.daq_viewerpython -m pymodaq.control_modules.daq_movepython -m pymodaq.extensions.h5browserpython -m pymodaq_plugin_manager.manager
The -m option tells Python to look within its site-packages folder (where you’ve just installed pymodaq) and necessarily starts the main function. This can be useful if you create your own extension (see Extension Plugins) for example.
2.1.4. Creating shortcuts on Windows
Python packages can easily be started from the command line (see Loading modules). However, Windows users will probably prefer using shortcuts on the desktop. Here is how to do it (Thanks to Christophe Halgand for the procedure):
First create a shortcut (see Fig. 2.2) on your desktop (pointing to any file or program, it doesn’t matter)
Right click on it and open its properties (see Fig. 2.3)
On the Start in field (“Démarrer dans” in french and in the figure), enter the path to the condabin folder of your miniconda or anaconda distribution, for instance:
C:\Miniconda3\condabinOn the Target field, (“Cible” in french and in the figure), enter this string:
C:\Windows\System32\cmd.exe /k conda activate my_env & python -m pymodaq.dashboard. This means that your shortcut will open the windows’s command line, then execute your environment activation (conda activate my_env bit), then finally execute and start Python, opening the correct pymodaq file (here dashboard.py, starting the Dashboard module, python -m pymodaq.dashboard bit)You’re done!
Do it again for each PyMoDAQ’s module you want (to get the correct python file and it’s path, see Loading modules).
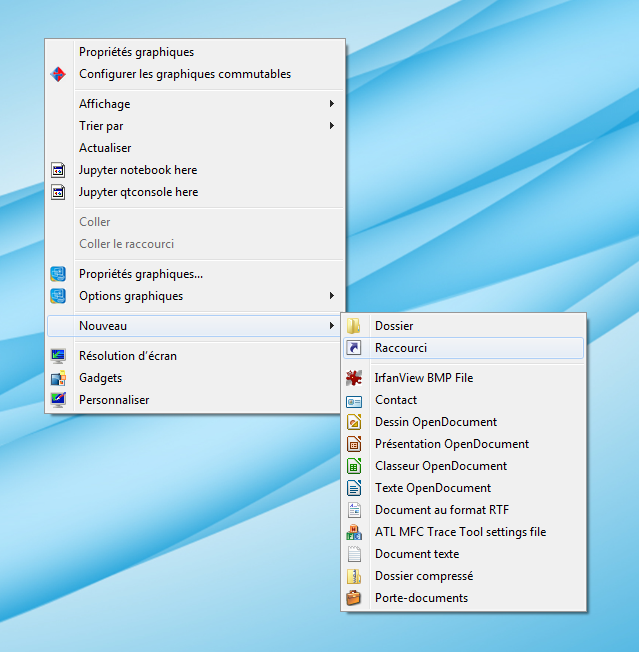
Fig. 2.2 Create a shortcut on your desktop
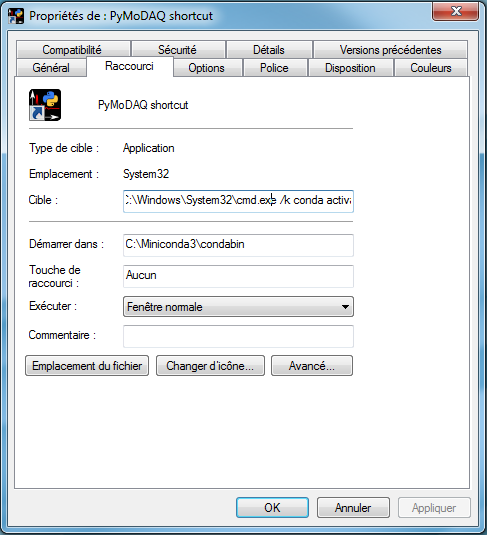
Fig. 2.3 Shortcut properties