4.2.2. Instrument Plugins
Any new hardware has to be included in PyMoDAQ within a plugin. A PyMoDAQ’s plugin is a python package
containing several added functionalities such as instruments objects. A instrument object is a class inheriting from either
a DAQ_Move_Base or a DAQ_Viewer_Base class`and implementing mandatory methods for easy and quick inclusion of the instrument
within the PyMoDAQ control modules.
Plugins are articulated given their type: Moves or Viewers and for the latter their main dimensionality: 0D, 1D or 2D. It is recommended to start from the template repository that includes templates for all kind of instruments and also the generic structure to build and publish a given plugin.
You will find below some information on the how to but comparison with existing plugins packages will be beneficial.
Note
You’ll find in this documentation a detailed tutorial on Story of an instrument plugin development.
4.2.2.1. Installation
The main and official list of plugins is located in the pymodaq_plugin_manager repository on github. This constitutes a list of (contributed) python package that can be installed using the Plugin Manager (or directly using pip). Other unofficial plugins may also be installed if they follow PyMoDAQ’s plugin specifications but you are invited to let know other users of the plugins you develop in order to contribute to PyMoDAQ’s development.
PyMoDAQ is looking at startup for all installed packages that it can consider as its plugins. This includes by default the pymodaq_plugins_mock package of mock instruments installed on the site_packages location in your python distribution.
4.2.2.2. Contributions
If you wish to develop a plugin specific to a new hardware or feature not present on the github repo (and I strongly encourage you to do so!!), you will have to follow the rules as below.
Two cases are possible: either you want to add a new hardware from a manufacturer for which a repository already exists 1) (thorlabs, PI, Andor…) or not 2)
You have to fork the existing repo
you will use the pymodaq_plugins_template on github to create a new repo (see also the How to create a new plugin/package for PyMoDAQ? tutorial)
Once you’ve done that, you can clone the package locally and install it in developer using pip install -e . from
the command line where you cd within the cloned package.
This command will install the package but any change you apply on the local folder will be applied on the package.
Then just add a new python file in the correct location.
Once you’re ready with a working plugin, you can then:
Publish your repo on pypi (just by doing a release on github will trigger the creation of a pypi repository
do a pull request on the initial repository to merge your new implementations.
Note
Starting with PyMoDAQ version 4.1.0 onwards, old github actions for publication and suite testing should be updated in the plugin packages. You can just use the one from the template repository
All the packages published on pypi using the template and the naming convention will be available in the plugin manager.
A very detailed tutorial has been published in this documentation: Story of an instrument plugin development and you can in the mean time look at this video
4.2.2.3. Naming convention
For an instrument plugin to be properly recognised by PyMoDAQ, the location and name of the underlying script must follow some rules and syntax. The plugin template package could be copied locally as a starting point:
The plugin package will be named pymodaq_plugins_xxxx (name: xxxx)
An actuator plugin (name: xxxx) will be a script whose name is daq_move_Xxxx (notice first X letter is capital)
The main instrument class within the script will be named DAQ_Move_Xxxx (notice the capital letters here as well and sorry if it is troublesome)
A detector plugin of dimensionality N (N=0, 1, 2 or N) (name: xxxx) will be a script whose name is daq_NDviewer_Xxxx (notice first X letter is capital, and replace N by 0, 1, 2 or leave it for higher dimensionality)
The main instrument class within the script will be named DAQ_NDViewer_Xxxx (notice the capital letters here as well)
4.2.2.4. Hardware Settings
An important feature similar for all modules is the layout as a tree structure of all the hardware parameters.
These settings will appear on the UI as a tree of parameters with a title and different types, see Fig. 4.1.
On the module side, they will be instantiated as a list of dictionaries and later exist in the object self.settings.
This object inherits from the Parameter object defined in pyqtgraph.
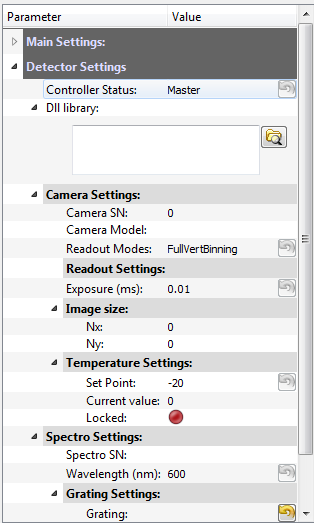
Fig. 4.1 Typical hardware settings represented as a tree structure (here from the daq_2Dviewer_AndorCCD plugin)
Here is an example of such a list of dictionaries corresponding to Fig. 4.1:
[{'title': 'Dll library:', 'name': 'andor_lib', 'type': 'browsepath', 'value': libpath},
 {'title': 'Camera Settings:', 'name': 'camera_settings', 'type': 'group', 'expanded': True, 'children': [
     {'title': 'Camera SN:', 'name': 'camera_serialnumber', 'type': 'int', 'value': 0, 'readonly': True},
     {'title': 'Camera Model:', 'name': 'camera_model', 'type': 'str', 'value': '', 'readonly': True},
     {'title': 'Readout Modes:', 'name': 'readout', 'type': 'list', 'values': ['FullVertBinning','Imaging'], 'value': 'FullVertBinning'},
     {'title': 'Readout Settings:', 'name': 'readout_settings', 'type': 'group', 'children':[
         {'title': 'single Track Settings:', 'name': 'st_settings', 'type': 'group', 'visible': False, 'children':[
             {'title': 'Center pixel:', 'name': 'st_center', 'type': 'int', 'value': 1 , 'default':1, 'min':1},
             {'title': 'Height:', 'name': 'st_height', 'type': 'int', 'value': 1 , 'default':1, 'min':1},
             ]},]}]}]
The list of available types of parameters (defined in pymodaq.utils.parameter.pymodaq_ptypes.py) is:
group: “camera settings” on Fig. 4.1 is of type groupint: settable integer (SpinBox_Custom object)float: settable float (SpinBox_Custom object)str: a QLineEdit object (see Qt5 documentation)list: “Readout Modes” Fig. 4.1 is a combo boxbool: checkable booleanbool_push: a checkable boolean in the form of a QPushButtonled: non checkable boolean in the form of a green (True) of red (False) ledled_push: checkable boolean in the form of a green (True) of red (False) leddate_time: a QDateTime object (see Qt5 documentation)date: a QDate object (see Qt5 documentation)time: a QTime object (see Qt5 documentation)slide: a combination of a slide and spinbox for floating point values (linear of log scale)itemselect: an object to easily select one or more items among a fewbrowsepath: a text area and a pushbutton to select a given path or filetext: a text area (for comments for instance)
Important: the name key in the dictionnaries must not contain any space, please use underscore if necessary!
Note
For a live example of these Parameters and their widget, type in parameter_example in your shell or check the
example folder
Once the module is initialized, any modification on the UI hardware settings will be send to the plugin through
the commit_settings method of the plugin class and illustrated below (still from the daq_2Dviewer_AndorCCD plugin).
The param method argument is of the type Parameter (from pyqtgraph):
def commit_settings(self,param):
    """
        | Activate parameters changes on the hardware from parameter's name.
    """
    try:
        if param.name()=='set_point':
            self.controller.SetTemperature(param.value())

        elif param.name() == 'readout' or param.name() in custom_parameter_tree.iter_children(self.settings.child('camera_settings', 'readout_settings')):
            self.update_read_mode()

        elif param.name()=='exposure':
            self.controller.SetExposureTime(self.settings.child('camera_settings','exposure').value()/1000) #temp should be in s
            (err, timings) = self.controller.GetAcquisitionTimings()
            self.settings.child('camera_settings','exposure').setValue(timings['exposure']*1000)
        elif param.name() == 'grating':
            index_grating = self.grating_list.index(param.value())
            self.get_set_grating(index_grating)
            self.emit_status(ThreadCommand('show_splash', ["Setting wavelength"]))
            err = self.controller.SetWavelengthSR(0, self.settings.child('spectro_settings','spectro_wl').value())
            self.emit_status(ThreadCommand('close_splash'))
4.2.2.5. Emission of data
When data are ready (see Data ready? to know about that), the plugin has to notify the viewer module in order to display data and eventually save them. For this PyMoDAQ use two types of signals (see pyqtsignal documentation for details):
dte_signal_tempdte_signal
where dte stands for DataToExport, see DataToExport.
Note
So far (07/07/2023) instrument plugins would use signals below to emit a list of DataFromPlugins objects
data_grabed_signal_temp(old style, will be deprecated)data_grabed_signal(old style, will be deprecated)
It will be deprecated in versions > 4.1, as the object to use and emit are now DataToExport objects
They both emit the same type of signal but will trigger different behaviour from the viewer module. The first is to be used to send temporary data to update the plotting but without triggering anything else (so that the DAQ_Scan still awaits for data completion before moving on). It is also used in the initialisation of the plugin in order to preset the type and number of data viewers displayed by the viewer module. The second signal is to be used once data are fully ready to be send back to the user interface and further processed by DAQ_Scan or DAQ_Viewer instances. The code below is an example of emission of data:
from pymodaq.utils.data import Axis, DataFromPlugins, DataToExport
x_axis = Axis(label='Wavelength', units= "nm", data = vector_X)
y_axis = Axis(data=vector_Y)
self.dte_signal.emit(DataToExport('mydata', data=[
    DataFromPlugins(name='Camera',data=[data2D_0, data2D_1,...],
                    dim='Data2D', x_axis=x_axis,y_axis=y_axis),
    DataFromPlugins(name='Spectrum',data=[data1D_0, data1D_1,...],
                    dim='Data1D', x_axis=x_axis, labels=['label0', 'label1', ...]),
    DataFromPlugins(name='Current',data=[data0D_0, data0D_1,...],
                    dim='Data0D'),
    DataFromPlugins(name='Datacube',data=[dataND_0, dataND_1,...],
                    dim='DataND', nav_indexes=(0,2),
                    axes=[Axis(data=.., label='Xaxis', units= "µm", index=0)]))
Such an emitted signal would trigger the initialization of 4 data viewers in the viewer module. One for each
DataFromPlugins in the data attribute (which is a list of DataFromPlugins). The type of data viewer will be
determined by the dim key value while its name will be set to the name parameter value, for more details on
data objects, see What is PyMoDAQ’s Data?
Note
New in version 4.1.0
Deprecated in version 4.2.0, but still working
The behaviour of the DAQ_Viewer can be even more tailored using two extra boolean attributes in the DataWithAxes objects.
save: will tell the DAQ_Viewer whether it should save the corresponding dwa (short forDataWithAwes)plot: will tell the DAQ_Viewer whether it should plot the corresponding dwa
New in version 4.2.0
the save and plot extra-attributes have been replaced by:
do_save: will tell the DAQ_Viewer whether it should save the corresponding dwa (short forDataWithAwes)do_plot: will tell the DAQ_Viewer whether it should plot the corresponding dwa
DataFromPlugins objects have these two extra attributes by default with values set to True
4.2.2.5.1. Data ready?
One difficulty with these viewer plugins is to determine when data is ready to be read from the controller and then to be send to the user interface for plotting and saving. There are a few solutions:
synchronous: The simplest one. When the
grabcommand has been send to the controller (let’s say to itsgrab_syncmethod), thegrab_syncmethod will hold and freeze the plugin until the data are ready. The Mock plugin work like this.asynchronous: There are 2 ways of doing asynchronous waiting. The first is to poll the controller state to check if data are ready within a loop. This polling could be done with a while loop but if nothing more is done then the plugin will still be freezed, except if one process periodically the Qt queue event using
QtWidgets.QApplication.processEvents()method. The polling can also be done with a timer event, firing periodically a check of the data state (ready or not). Finally, the nicest/hardest solution is to use callbacks (if the controller provides one) and link it to aemit_datamethod.
4.2.2.5.2. Synchronous example:
The code below illustrates the poll method using a loop:
def poll_data(self):
    """
    Poll the current data state
    """
    sleep_ms=50
    ind=0
    data_ready = False
    while not self.controller.is_ready():
        QThread.msleep(sleep_ms)

        ind+=1

        if ind*sleep_ms>=self.settings.child(('timeout')).value():

            self.emit_status(ThreadCommand('raise_timeout'))
            break

        QtWidgets.QApplication.processEvents()
    self.emit_data()
4.2.2.5.3. Asynchronous example:
The code below is derived from daq_Andor_SDK2 (in andor hardware folder) and shows how to create a thread waiting for data ready and triggering the emission of data
class DAQ_AndorSDK2(DAQ_Viewer_base):

    callback_signal = QtCore.Signal() #used to talk with the callback object
    ...

    def ini_camera(self):
        ...
        callback = AndorCallback(self.controller.WaitForAcquisition) # the callback is linked to the controller WaitForAcquisition method
        self.callback_thread = QtCore.QThread() #creation of a Qt5 thread
        callback.moveToThread(self.callback_thread) #callback object will live within this thread
        callback.data_sig.connect(self.emit_data)  # when the wait for acquisition returns (with data taken), emit_data will be fired

        self.callback_signal.connect(callback.wait_for_acquisition) #
        self.callback_thread.callback = callback
        self.callback_thread.start()

    def grab(self,Naverage=1,**kwargs):
        ...
        self.callback_signal.emit()  #trigger the wait_for_acquisition method

def emit_data(self):
    """
        Function used to emit data obtained by callback.
    """
    ...
    self.dte_signal.emit(
        DataToExport('mydata',
                     data=[DataFromPlugins('Camera',
                                           data=[np.squeeze(self.data.reshape((sizey, sizex)).astype(np.float))])])


class AndorCallback(QtCore.QObject):

    data_sig=QtCore.Signal()
    def __init__(self,wait_fn):
        super(AndorCallback, self).__init__()
        self.wait_fn = wait_fn

    def wait_for_acquisition(self):
        err = self.wait_fn()

        if err != 'DRV_NO_NEW_DATA': #will be returned if the main thread called CancelWait
            self.data_sig.emit()
Documentation from Andor SDK concerning the WaitForAcquisition method of the dll:
unsigned int WINAPI WaitForAcquisition(void)WaitForAcquisitioncan be called after an acquisition is started using StartAcquisition to put the calling thread to sleep until an Acquisition Event occurs.It will use less processor resources than continuously polling with the GetStatus function. If you wish to restart the calling thread without waiting for an Acquisition event, call the function CancelWait.
4.2.2.5.4. Hardware averaging
By default, if averaging of data is needed the Viewer module will take care of it software wise. However, if the hardware
controller provides an efficient method to do it (that will save time) then you should set the class field
hardware_averaging to True.
class DAQ_NDViewer_Template(DAQ_Viewer_base):
"""
 Template to be used in order to write your own viewer modules
"""
    hardware_averaging = True #will use the accumulate acquisition mode if averaging
    #is True else averaging is done software wise
4.2.2.5.5. Live Mode
By default, the live Grab mode is done software wise in the core code of the DAQ_Viewer. However, if one want to send data as fast as possible, the live mode is possible within a plugin.
For this, the plugin class attribute, live_mode_available, should be set to True.
class DAQ_2DViewer_MockCamera(DAQ_Viewer_base):

    live_mode_available = True
The method grab_data will then receive a named boolean parameter (in kwargs) called live that tells if one should
grab or snap data. The MockCamera plugin illustrates this feature:
def grab_data(self, Naverage=1, **kwargs):
    """Start a grab from the detector

    Parameters
    ----------
    Naverage: int
        Number of hardware averaging (if hardware averaging is possible, self.hardware_averaging should be set to
        True in class preamble and you should code this implementation)
    kwargs: dict
        others optionals arguments
    """
    if 'live' in kwargs:
        if kwargs['live']:
            self.live = True
            # self.live = False  # don't want to use that for the moment

    if self.live:
        while self.live:
            data = self.average_data(Naverage)
            QThread.msleep(kwargs.get('wait_time', 100))
            self.dte_signal.emit(data)
            QtWidgets.QApplication.processEvents()
4.2.2.6. Hardware needed files
If you are using/referring to custom python wrappers/dlls… within your plugin and need a place where to copy them
in PyMoDAQ, then use the \hardware folder of your plugin package. For instance, the daq_2Dviewer_AndorCCD plugin need various files stored
in the andor folder (on github repository). I would therefore copy it as \pymodaq_plugins_andor\hardware\andor
and call whatever module I need within (meaning there is a __init__.py file in the andor folder) as:
#import controller wrapper
from pymodaq_plugins.hardware.andor import daq_AndorSDK2 #this import the module DAQ_AndorSDK2 containing classes, methods...
#and then use it as you see fit in your module
4.2.2.7. Actuator plugin having multiple axis
See also: Multiaxes controller
When an actuator’s controller can drive multiple axis (like a XY translation stage for instance), the plugin instrument class should defines two class attributes:
is_multiaxis should be set to True. This will trigger the display of the multiaxis section on the UI
axes_names should be a list or dict describing the different actuator such a controller can drive
class DAQ_Move_MockNamedAxes(DAQ_Move_base):
    is_multiaxes = True
    _axis_names = ['Xaxis', 'Yaxis', 'Zaxis']
    # or:
    _axis_names = {'Xaxis': 0, 'Yaxis': 1, 'Zaxis': 2}
would produce such display on the UI (Fig. Fig. 4.2):
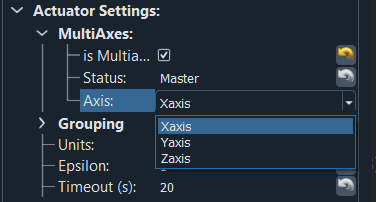
Fig. 4.2 Typical multiaxis settings represented as a combo box
Both the list or the dictionary will produce the same output on the UI but their use will depend of the controller and underlying methods of its driver to act on a particular axis. In the drivers derived from C code, methods will have an argument describing a particular axis as an integer. It is however not possible to pass integers directly to the combobox of the UI who holds strings. To deal with that pyqtgraph, and therefore pymodaq, uses a dictionary mapping the names of the axis (to be printed in the UI) to objects (here integers) to be used with the drivers’s method.
A set of methods/properties have been introduced to quickly manipulate those and get either the current axis name of associated value.
Case of a list of strings:
>>> self.axis_name
'Yaxis'
>>> self.axis_names
['Xaxis', 'Yaxis', 'Zaxis']
>>> self.axis_value
'Yaxis'
Case of a dictionary of strings/integers:
>>> self.axis_name
'Yaxis'
>>> self.axei_names
{'Xaxis': 0, 'Yaxis': 1, 'Zaxis': 2}
>>> self.axis_value
1
4.2.2.8. Modifying the UI from the instrument plugin class
The user interface control module and the instrument plugin class are not in the same thread, moreover, the plugin
class is not aware of the UI object (DAQ_Move or DAQ_Viewer). Therefore, you’ll find below ways to interact with
the UI from the plugin class.
The most generic way (valid for both control modules) is to use the emit_status method, defined in the parent class
of the instrument plugin class. Such a method takes one argument, a ThreadCommand and will send this object
to the thread_status method of the UI main class.
Note
A ThreadCommand is an object taking two arguments a string (the command) and a named attribute called attribute
that can be any type. This ThreadCommand is used everywhere
in PyMoDAQ to communicate between threads.
Control modules share some commands,
see thread_status
Update_status: call the update_status method with status attribute as a string
close: close the current thread and delete corresponding attribute on cascade.
update_main_settings: update the main settings in the UI settings tree
update_settings: update the actuator’s settings in the UI settings tree
raise_timeout: call the raise_timeout method
show_splash: show the splash screen displaying info from the argument attributes of the command
close_splash: close the splash screen
4.2.2.8.1. Splash Screen and info
You can therefore show info about initialization in a splash screen using (taken from the Mock 0DViewer plugin):
self.emit_status(ThreadCommand('show_splash', 'Starting initialization'))
QtCore.QThread.msleep(500)
self.ini_detector_init(old_controller=controller,
                     new_controller='Mock controller')
self.emit_status(ThreadCommand('show_splash', 'generating Mock Data'))
QtCore.QThread.msleep(500)
self.set_Mock_data()
self.emit_status(ThreadCommand('update_main_settings', [['wait_time'],
                                                      self.settings.child('wait_time').value(), 'value']))
self.emit_status(ThreadCommand('show_splash', 'Displaying initial data'))
QtCore.QThread.msleep(500)
# initialize viewers with the future type of data
self.dte_signal_temp.emit(DataToExport('Mock0D', data=[DataFromPlugins(name='Mock1', data=[np.array([0])],
                                                                     dim='Data0D',
                                                                     labels=['Mock1', 'label2'])]))
self.emit_status(ThreadCommand('close_splash'))
4.2.2.8.2. Modifying the UI settings
if you want to modify the settings tree of the UI (the Main Settings part as the other one, you can do so within the plugin directly), you can do so using:
self.emit_status(ThreadCommand('update_main_settings', [['wait_time'], 10, 'value']))
The attribute of the ThreadCommand is a bit complex here [['wait_time'], 10, 'value']. It is a list of three
variables:
a list of string defining a path in the main_settings tree hierarchy
an object (here an integer)
a string specifying the type of modification, either:
value: the object should therefore be the new value of the modified parameter
limits: the object should be a sequence listing the limits of the parameter (depends on the type of parameter)
options: the object is a dictionary defining the options to modify
childAdded: the object is a dictionary generated using SaveState of a given Parameter
4.2.2.8.3. DAQ_Move specific commands
Specifics commands for the DAQ_Move are listed in:
thread_status and explained a bit below
ini_stage: obtains info from the initialization
get_actuator_value: update the UI current value
move_done: update the UI current value and emits the move_done signal
outofbounds: emits the bounds_signal signal with a True argument
set_allowed_values: used to change the behaviour of the spinbox controlling absolute values, see
set_abs_spinbox_propertiesstop: stop the motion
You can directly modify the printed current actuator’s value using the emit_value(12.4) method which is a shortcut
of emit_status(ThreadCommand('get_actuator_value', 12.4)). In that case the printed value would show 12.4.
You can also modify some SpinBox of the UI (the ones used to specify the absolute values) using the set_allowed_values
command. In that case the attribute argument of the ThreadCommand should be a dictionary, see
set_abs_spinbox_properties.
4.2.2.8.4. DAQ_Viewer specific commands
Specifics commands for the DAQ_Viewer are listed in:
thread_status and explained a bit below
ini_detector: update the status with “detector initialized” value and init state if attribute not null.
grab : emit grab_status(True)
grab_stopped: emit grab_status(False)
init_lcd: display a LCD panel
lcd: display on the LCD panel, the content of the attribute
stop: stop the grab
The interesting bit is the possibility to display a
LCD widget to display some numerical values (could be
0D Data also emitted using the dte_signal but could also be any values). You should first init the LCD screen
using the command: init_lcd with an attribute being a dictionary with keys either:
digits: an integer specifying the number of digits to display
Nvals: the number of numerical values to be displayed
labels: the name/label of each value
For instance, in the 0D Mock viewer plugin:
if not self.lcd_init:
    self.emit_status(ThreadCommand('init_lcd', dict(labels=['dat0', 'data1'], Nvals=2, digits=6)))
    QtWidgets.QApplication.processEvents()
    self.lcd_init = True
self.emit_status(ThreadCommand('lcd', data_tot))
Where the lcd is first initialized, then data are sent using the lcd command taking as attribute a list of 0D
numpy arrays