2.5.8. Sequencer
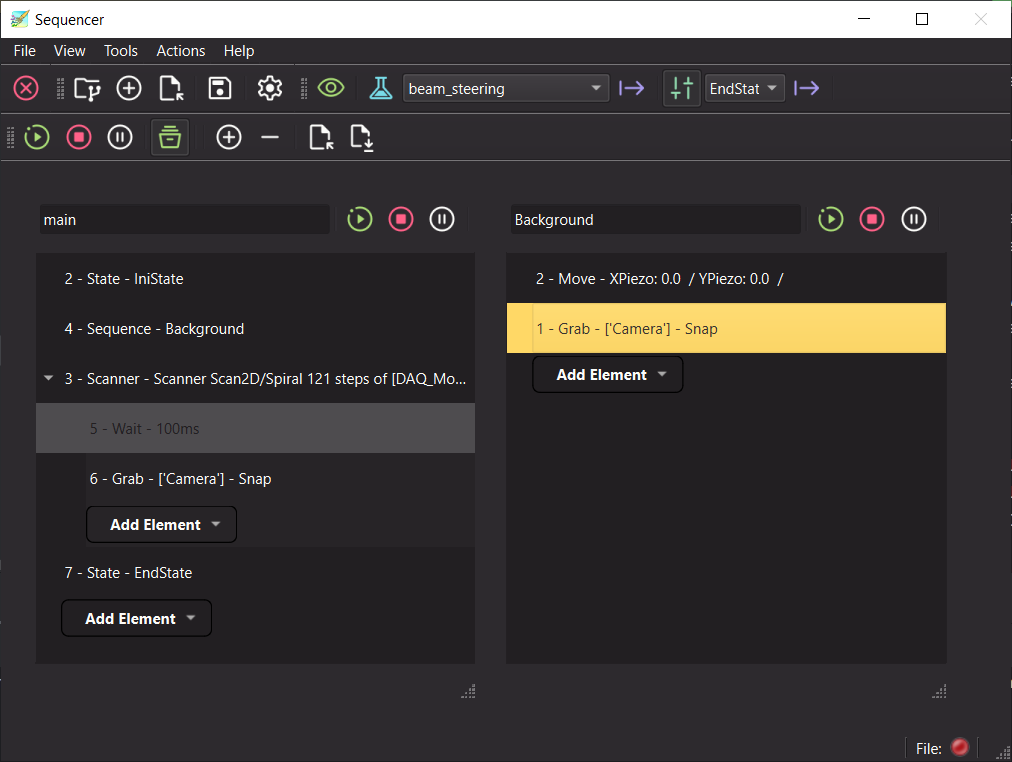
Fig. 2.86 The Sequencer extension with two sequences: the main one (left) calling a second one (right).
2.5.8.1. Introduction
The Sequencer builds an experiment procedure graphically, without code: a tree of elements (apply a state, move actuators, grab detectors, wait, repeat, scan, choose where to go next…) executed one after the other on the actuators and detectors of the Dashboard.
2.5.8.1.1. Typical workflow
Define an experiment in the Dashboard and apply it with the Dashboard toolbar of the extension (some elements also need a state).
Build the sequence: add elements with the Add Element button at the end of each level of the tree, and double click on an element to configure it. Repeat and Scanner elements are containers executing their children. Drag and drop reorders the elements and each one has an Execute button to test it alone.
Optionally add other sequences (Add Sequence) that the main one calls with a Sequence element.
Check Log to save all the produced data in a h5 file (select it with the file toolbar), then press Start. The status bar shows the running element, Pause and Stop act at any time.
Save the sequences in a
.seqfile with Save Sequence to reuse them later.
2.5.8.1.2. Good to know
If some elements are not valid (module not available in the Dashboard, no experiment applied, missing Choice target…) the sequence does not start and the errors are written in the log.
A paused sequence executes again, from its start, the element that was running when it is resumed.
The
.seqfiles are human readable and can be written or modified by hand.The logged data can be explored with the H5Browser.
The Sequencer complements the DAQ Scan: use it when your experiment is a procedure (move some stages to a starting point, wait for a temperature to settle, take a few snapshots, check a signal level and, depending on its value, go back a few steps or move on to the next configuration…) rather than a regular grid of actuators positions.
Some elements (Repeat, Scanner) are containers: they execute their children elements one or several times. Under the hood, each sequence is executed by a Qt state machine, so the GUI is never blocked and a running sequence can be paused, resumed or stopped at any time. The data produced while running can be logged in a h5 file, with time stamps, the same way as the DAQ_Logger does.
Sequences can be saved in human readable files (.seq) and loaded back later. These files can also be written or
modified by hand, see Sequence files (.seq).
2.5.8.2. Launching the Sequencer
Like the other extensions, the Sequencer is started from the Extensions menu of the DashBoard. It then acts on the actuators and detectors declared in the Dashboard.
It can also be started on its own by running the sequencer.py module. A Dashboard is created under the hood and
the command line arguments of the Dashboard can be used, for instance to load an experiment at startup:
python -m pymodaq.extensions.sequencer.sequencer -x my_experiment
Note
Some elements (State, Grab, Choice with the threshold model) rely on the modules and states of the Dashboard. An Experiment should therefore be applied in the Dashboard before using them, and the State element needs some entries defined in the StateManager.
2.5.8.3. The User Interface
2.5.8.3.1. Main toolbar
The main window (see Fig. 2.86) has a toolbar with:
the h5 file actions, to select or create the h5 file where data will be logged and to show the saving settings. They are provided by the The H5 file manager shared by many extensions
the Dashboard toolbar, to show/hide the Dashboard and to select and apply experiments and states, see The DashBoard toolbar in extensions
Add Sequence / Remove Sequence: add a new sequence panel, or remove the last one (the main one cannot be removed)
Load Sequence / Save Sequence: load or save all the sequences from/to a
.seqfilethe workflow actions:
Start: starts the main sequence (the first panel). The other sequences are only executed when called by a Sequence element
Stop: stops all sequences
Pause: pauses/resumes all sequences
Log: if checked when starting, all data produced while running are logged in the h5 file, see Data logging
2.5.8.3.2. Sequence panels
Each sequence is displayed in its own panel with:
an editable name (press Enter to validate). Other elements referring to this sequence are updated accordingly
its own Start, Stop and Pause buttons, to execute only this sequence
the tree of elements
a status bar displaying the element currently executed
2.5.8.3.3. Editing a sequence
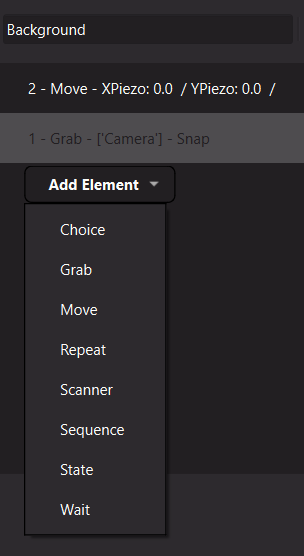
Fig. 2.87 Adding an element using the Add Element button at the end of a level of the tree.
Elements are added using the Add Element button displayed at the end of each level of the tree (see Fig. 2.87): at the root of the sequence and inside each container element. The tree also has a context menu (right click) to:
Add Element: inserts the element after the selected one, or as the first child if the selected element is a container
Remove Element (Del key): removes the selected element (and its children)
Clear Children: removes all the elements at the level of the selected element (or all its children for a container)
Load Sequence File (Ctrl+O) / Save Sequence File (Ctrl+S): load or save only this sequence
Elements can be reordered or moved into/out of containers using drag and drop.
Each element is displayed with:
its id: a unique integer used by the Choice element to select where to jump
its type and a summary of its configuration
an Execute button, to execute this element on its own (useful to test it)
Double clicking on an element opens its editor as a popup window. The editors of each element are described below. Close the popup (click outside or press Enter) to validate the changes.
2.5.8.4. The Elements
2.5.8.4.1. State

Fig. 2.88 The State element editor.
Applies one of the states defined in the StateManager of the Dashboard for the current experiment: actuators positions, detectors and actuators settings… Select the state in the editor (Fig. 2.88); the Show Manager button opens the State Manager to review or create states. The sequence moves on once the state has been applied. The actuators moves triggered by the state are logged.
As a state has a name, the sequence is easier to read: State - align_beam says more about what a step does than a
list of actuators values. This is why the State element is often a better choice than the
Move element for setting up your instruments.
2.5.8.4.2. Move
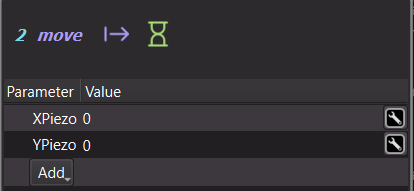
Fig. 2.89 The Move element editor with two actuators.
Moves one or several actuators of the Dashboard to absolute values. In the editor (Fig. 2.89), use the Add button to select the actuators to be moved and set their target values. The units are the ones of each actuator.
The hourglass button sets whether the element should wait for all the moves to be done before moving on to the next element (default) or should move on immediately. Once the moves are done, the reached positions are logged.
Tip
If a given set of moves corresponds to a meaningful configuration of your setup, it may be better to prepare a State for it in the StateManager and to use a State element: the state name tells what the step does, and the same state can be reused in other sequences or applied by hand from the Dashboard.
2.5.8.4.3. Grab
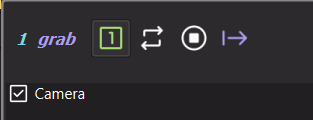
Fig. 2.90 The Grab element editor.
Acquires data from one or several detectors, selected using the check boxes of the editor (Fig. 2.90). Three modes are available from the toolbar:
Snap: triggers a single acquisition on all selected detectors and waits for all of them to have finished. The data are logged and the sequence moves on
Grab: starts a continuous acquisition on the selected detectors and moves on immediately. Each acquired data will be logged until the detectors are stopped
Stop: stops any continuous acquisition on the selected detectors
2.5.8.4.4. Wait

Fig. 2.91 The Wait element editor.
Waits for a given time, in milliseconds (Fig. 2.91), before moving on to the next element.
2.5.8.4.5. Repeat

Fig. 2.92 The Repeat element editor.
A container element: executes all its children a given number of times (Fig. 2.92), then moves on to the next element.
2.5.8.4.6. Scanner
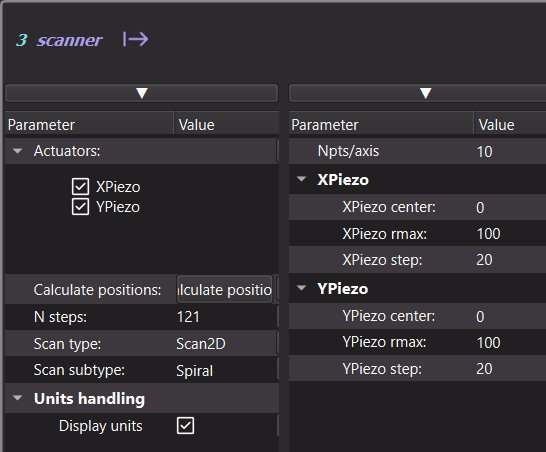
Fig. 2.93 The Scanner element editor.
A container element embedding the same Scanner as the DAQ_Scan, see Scanner. Select the actuators and the scan type and settings in the editor (Fig. 2.93). When executed, for each step of the scan the element moves the actuators, logs their positions, then executes all its children. Once the last step is done, the sequence moves on to the next element. The current step is displayed in the element summary.
This allows to build scans with arbitrary actions at each step: a snap with some detectors, a wait, a nested scan, a different detector configuration through a State element…
Note
A future Optimize element, using the optimizer extensions (see Bayesian Optimisation), will allow to re-optimize a data signal during a scan, for instance to compensate for a drift of your setup at each step.
2.5.8.4.7. Choice
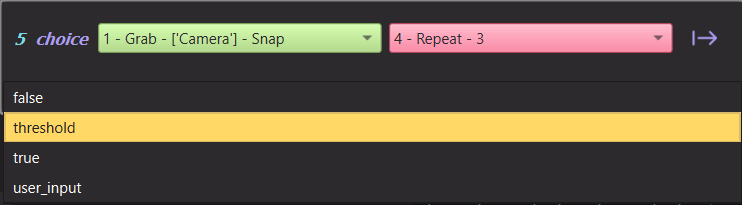
Fig. 2.94 The Choice element editor using the threshold model.
The Choice element is what makes a sequence more than a list of actions: it evaluates a condition and jumps to one element if the result is True and to another one if it is False. The two target elements are selected by their id in the green (True) and red (False) combo boxes of the editor (Fig. 2.94). Any element of the sequence can be a target, before or after the Choice element: you can build loops (jump backward), branches (jump forward) or early exits.
The condition is given by a choice model, selected in the editor. The models shipped with PyMoDAQ are:
true / false: always jump to the True (resp. False) target. They are mostly meant for debugging and testing purposes, but can also be used as unconditional jumps (go to)
user_input: opens a dialog asking the user to Proceed (True) or Go back (False)
threshold: grabs data from the selected detectors and compares a scalar (0D) data to a threshold. Select the detectors, press Probe Data to get the list of available 0D data, select one of them, then set the threshold value and the direction: Above (True if the data is above the threshold) or Below
Other models can be written, see Writing a custom choice model.
As an example, Fig. 2.95 shows a sequence moving an actuator, taking three snapshots, and checking a signal: if it is above the threshold, a new State is applied on the Dashboard, otherwise the procedure starts again.
Fig. 2.95 Execution flow of a sequence using a Choice element to loop back.
2.5.8.4.8. Sequence

Fig. 2.96 The Sequence element editor.
Executes another sequence, selected in the editor (Fig. 2.96) among the other panels of the Sequencer (a sequence cannot call itself). The calling sequence moves on once the called one has finished.
This allows to split a long procedure into reusable blocks. If a called sequence is renamed, the elements calling it are updated. If it is removed, they are set to another sequence and a warning is displayed so you can review them.
2.5.8.5. Running a sequence
When a sequence is started (from the main toolbar for the main sequence, or from its panel), all its elements are first checked. If some are not valid (an actuator or a detector not available in the Dashboard, a missing Choice target, no experiment applied…) the errors are written in the log and the status bar displays Some elements are not valid, check the log: the sequence is not started.
While running, the element being executed is selected in the tree and displayed in the status bar.
Pause: the sequence is paused as soon as possible. When resumed, the element that was running when paused is executed again from its start. The containers enclosing it keep their loop counters
Stop: the sequence is stopped. Stopping from the main toolbar stops all sequences
2.5.8.6. Data logging
If the Log action is checked when the sequence is started, all data produced by the elements are saved in the h5
file selected using the file toolbar, or automatically created using the standard naming convention
(<base path>/<year>/<yyyymmdd>/Dataset_<yyyymmdd>_<nnn>.h5), see The H5 file manager. The data logged are:
the data snapped or grabbed by the Grab elements
the actuators positions reached by the Move, Scanner and State elements
Each run creates a new node in the h5 file. Data are saved under the node of the control module that produced them, with their time stamps, as done by the DAQ_Logger. The resulting file can be explored with the Data Browsing: the H5Browser module.
2.5.8.7. Sequence files (.seq)
Sequences are saved in .seq files, by default in the sequences folder of PyMoDAQ’s configuration directory.
They are YAML files: they can be read, modified or even written from scratch with any text
editor, then loaded in the Sequencer. This section describes their structure and the fields of each element.
Tip
The easiest way to get a valid file is to build a small sequence in the GUI, save it, and use it as a template.
2.5.8.7.1. Structure of a file
A file saved using the Save Sequence action of the main toolbar contains all the sequences of the Sequencer under a
sequences key. Each sequence is given by its name (the name of its panel) and its root element:
sequences:
  main:                # first sequence: the one executed by the main Start action
    elt_name: root
    id: -1
    children:
    - ...              # the elements of the main sequence
  calibration:         # another sequence, called from a Sequence element
    elt_name: root
    id: -1
    children:
    - ...
When loaded, the panels of the Sequencer are replaced by the sequences of the file, in the same order. The first one is the main sequence.
A file saved from the context menu of a sequence panel (Save Sequence File) contains only the root element of this
sequence, without the sequences and name levels:
elt_name: root
id: -1
children:
- ...
Such a file can be loaded in a given panel using its context menu. If it is loaded using the Load Sequence action of the main toolbar, it replaces all sequences and is loaded in the main panel.
2.5.8.7.2. Common fields
Every element is a YAML mapping with at least:
Field |
Type |
Description |
|---|---|---|
|
string |
the type of the element: |
|
integer |
the id of the element, displayed in the tree. Ids must be unique within a sequence as they are used as
targets by the Choice elements. The root element has the id |
|
list |
only for container elements ( |
The other fields depend on the type of the element and are described below. Unless stated otherwise, a field is required: a missing one will prevent the file to be loaded.
Some fields are only informative: they are saved to keep track of the configuration when the file was saved (for instance the list of available detectors) and are updated from the Dashboard once loaded. Names of actuators, detectors and states must match the ones of the experiment loaded in the Dashboard, otherwise the element will be reported as invalid when starting the sequence.
2.5.8.7.2.1. state
Field |
Type |
Description |
|---|---|---|
|
string |
name of the state to apply, as defined in the State Manager for the current experiment |
|
string |
informative: the experiment for which the state was selected |
|
list of strings |
informative: the states available when the file was saved |
- elt_name: state
  id: 1
  state: align_beam
  experiment: my_experiment
  states: [default, align_beam, measurement]
2.5.8.7.2.2. move
Each actuator to be moved is given as a key (the actuator name) with its target value and units as a string, parsed using pint. The units should be compatible with the units of the actuator.
Field |
Type |
Description |
|---|---|---|
|
string |
target value with units, e.g. |
|
boolean |
optional (default |
- elt_name: move
  id: 2
  Xaxis: 12.5 mm
  Theta: -3 deg
  wait_move_done: true
2.5.8.7.2.3. grab
All fields are optional.
Field |
Type |
Description |
|---|---|---|
|
list of strings |
names of the detectors to acquire with (default: none, the element then does nothing) |
|
string |
|
|
list of strings |
informative: the detectors available when the file was saved |
- elt_name: grab
  id: 3
  detectors: [Det 0D, Camera]
  selected: [Det 0D]
  status: Snap
2.5.8.7.2.4. wait
Field |
Type |
Description |
|---|---|---|
|
integer |
waiting time in milliseconds (positive) |
- elt_name: wait
  id: 4
  wait_time: 500
2.5.8.7.2.5. repeat
Field |
Type |
Description |
|---|---|---|
|
integer |
number of times the children are executed (at least 1) |
|
list |
the elements to repeat |
- elt_name: repeat
  id: 5
  n_repeat: 3
  children:
  - elt_name: wait
    id: 6
    wait_time: 100
2.5.8.7.2.6. scanner
The fields are the ones of the Scanner used in the DAQ_Scan (see Scanner).
Field |
Type |
Description |
|---|---|---|
|
list of strings |
names of the actuators that may be used by the scanner |
|
list of strings |
names of the actuators actually scanned (their number should match the scan type: one for |
|
string |
the scan type, e.g. |
|
string |
the scan subtype, e.g. |
|
boolean |
display the actuators units in the scanner settings |
|
integer |
informative: the number of steps of the scan (computed from the scanner settings) |
|
mapping |
the settings specific to the scan type and subtype. For a |
|
list |
the elements executed at each step of the scan |
- elt_name: scanner
  id: 7
  actuators: [Xaxis, Yaxis, Theta]
  selected: [Xaxis]
  scan_type: Scan1D
  scan_sub_type: Linear
  display_units: true
  n_steps: 11
  scanner:
    start: 0.0
    stop: 10.0
    step: 1.0
  children:
  - elt_name: grab
    id: 8
    selected: [Camera]
    status: Snap
2.5.8.7.2.7. choice
Field |
Type |
Description |
|---|---|---|
|
integer |
id of the element to jump to if the condition is True |
|
integer |
id of the element to jump to if the condition is False |
|
string |
the name of the choice model: |
… |
the settings of the choice model, if any (see below) |
The true, false and user_input models have no settings. The threshold model needs:
Field |
Type |
Description |
|---|---|---|
|
mapping |
|
|
string |
full name of the 0D data to compare, as |
|
list of strings |
the 0D data names proposed in the editor (should contain |
|
float |
the threshold value |
|
string |
|
|
list of strings |
should be |
- elt_name: choice
  id: 9
  go_to_true: 10
  go_to_false: 1
  choice_model: threshold
  detectors: {all_items: [Det 0D, Camera], selected: [Det 0D]}
  data_names: [Det 0D/CH00]
  data_name: Det 0D/CH00
  threshold: 0.5
  directions: [Above, Below]
  direction: Above
2.5.8.7.2.8. sequence
Field |
Type |
Description |
|---|---|---|
|
string |
name of the sequence to execute. It should be another sequence of the same file (not the one this element belongs to) |
- elt_name: sequence
  id: 11
  sequence: calibration
2.5.8.7.3. A complete example
Below is the file corresponding to the example of Fig. 2.95:
sequences:
  main:
    elt_name: root
    id: -1
    children:
    - elt_name: move
      id: 1
      Xaxis: 0.0 mm
      wait_move_done: true
    - elt_name: repeat
      id: 2
      n_repeat: 3
      children:
      - elt_name: grab
        id: 3
        detectors: [Det 0D, Camera]
        selected: [Det 0D]
        status: Snap
      - elt_name: wait
        id: 4
        wait_time: 500
    - elt_name: choice
      id: 5
      go_to_true: 6          # go on to the State element
      go_to_false: 1         # start again from the Move element
      choice_model: threshold
      detectors: {all_items: [Det 0D, Camera], selected: [Det 0D]}
      data_names: [Det 0D/CH00]
      data_name: Det 0D/CH00
      threshold: 0.5
      directions: [Above, Below]
      direction: Above
    - elt_name: state
      id: 6
      state: measurement
      experiment: my_experiment
      states: [default, measurement]
2.5.8.8. Going further
To understand how the Sequencer works under the hood, and to write your own elements or choice models, see the developer’s guide: Extending the Sequencer
The classes of the Sequencer are described in the API section: The Sequencer Extension