3.1. Installation
3.1.1. Preamble
PyMoDAQ is written in Python and uses Python 3.7+. It uses the Qt5 library (and a python Qt5 backend, see Qt5 backend) and the excellent pyqtgraph package for its user interface. For PyMoDAQ to run smoothly, you need a Python distribution to be installed. Here are some advices.
On all platforms Windows, MacOS or Linux, Anaconda or Miniconda is the advised distribution/package manager. Environments can be created to deal with different version of packages and isolate the code from other programs. Anaconda comes with a full set of installed scientific python packages while Miniconda is a very light package manager.
3.1.2. Setting up a new environment
Download and install Miniconda3.
Open a console, and cd to the location of the condabin folder, for instance:
C:\Miniconda3\condabinCreate a new environment:
conda create -n my_env python=3.8, where my_env is your new environment name, could be pymodaq353 if you plan to install PyMoDAQ version 3.5.3 for instance.. This will create the environment with python version 3.8 that is currently the recommended one, see Python Versions.Activate your environment so that only packages installed within this environment will be seen by Python:
conda activate my_env
3.1.3. Installing PyMoDAQ
Easiest part: in your newly created and activated environment enter: pip install pymodaq. This will install the
latest PyMoDAQ available version and all its dependencies. For a specific version enter: pip install pymodaq==x.y.z.
3.1.3.1. Qt5 backend
PyMoDAQ source code uses a python package called qtpy that add an abstraction layer between PyMoDAQ’s code and the actual Qt5 python implementation (either PyQt5 or PySide2, and soon PyQt6 and PySide6). Qtpy will look on what is installed on your environment and load PyQt5 by default (see the PyMoDAQ configuration for default values to change this default behaviour). This means you have to install one of these backends on your environment using either:
pip install pyqt5pip install pyside2(still some issues with some parts of pymodaq’s code. If you want to help fix them, please, don’t be shy!)pip install pyqt6(not tested yet)pip install pyside6(not tested yet)
3.1.3.2. Linux installation
For Linux installation, only Ubuntu operating system are currently being tested. In particular, one needs to make sure that the QT environment can be used. Running the following command should be sufficient to start with:
sudo apt install libxkbcommon-x11-0 libxcb-icccm4 libxcb-image0 libxcb-keysyms1 libxcb-randr0 libxcb-render-util0 libxcb-xinerama0 libxcb-xfixes0 x11-utils
It is also necessary to give some reading and writing permission access to some specific folders. In particular, PyMoDAQ creates two folders that are used to store configurations files, one assigned to the system in /etc/.pymodaq/ and one assigned to the user ~/.pymodaq/. We need to give reading/writing permission acess to the system folder. One should then run before/after installing pymodaq:
sudo mkdir /etc/.pymodaq/sudo chmod uo+rw /etc/.pymodaq
As a side note, these files are shared between different pymodaq’s versions (going from 3 to 4 for example). It is suggested to delete/remake the folder (or empty its content) when setting up a new environment with a different pymodaq version.
3.1.4. Creating shortcuts on Windows
Python packages can easily be started from the command line (see How to Start). However, Windows users will probably prefer using shortcuts on the desktop. Here is how to do it (Thanks to Christophe Halgand for the procedure):
First create a shortcut (see Fig. 3.1) on your desktop (pointing to any file or program, it doesn’t matter)
Right click on it and open its properties (see Fig. 3.2)
On the Start in field (“Démarrer dans” in french and in the figure), enter the path to the condabin folder of your miniconda or anaconda distribution, for instance:
C:\Miniconda3\condabinOn the Target field, (“Cible” in french and in the figure), enter this string:
C:\Windows\System32\cmd.exe /k conda activate my_env & python -m pymodaq.dashboard. This means that your shortcut will open the windows’s command line, then execute your environment activation (conda activate my_env bit), then finally execute and start Python, opening the correct pymodaq file (here dashboard.py, starting the Dashboard module, python -m pymodaq.dashboard bit)You’re done!
Do it again for each PyMoDAQ’s module you want (to get the correct python file and it’s path, see From command line tool:).
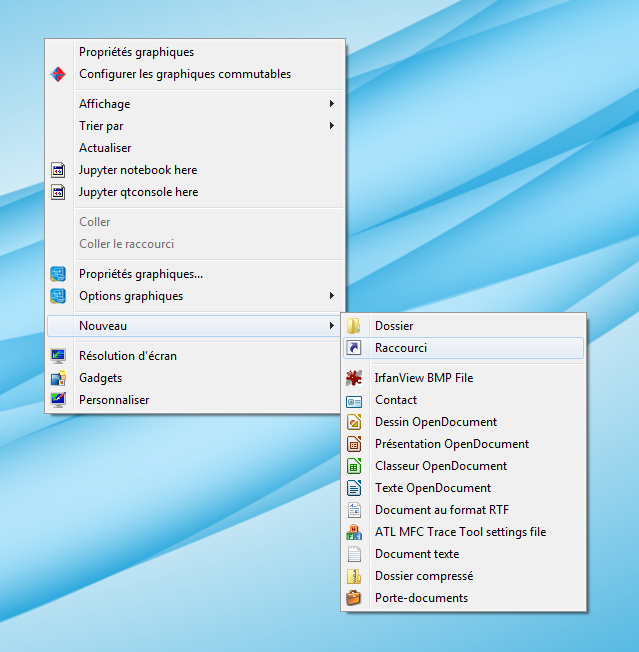
Fig. 3.1 Create a shortcut on your desktop
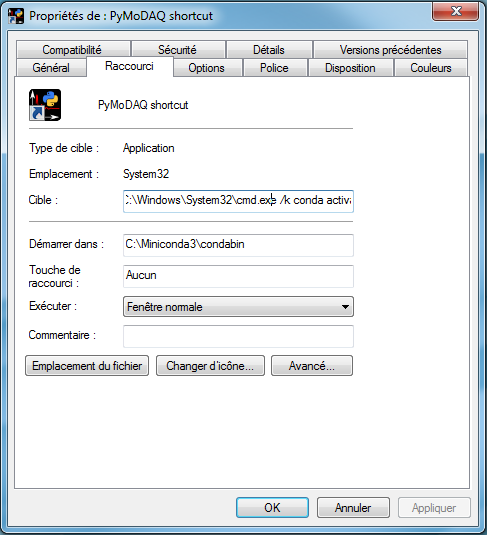
Fig. 3.2 Shortcut properties
3.1.5. Plugin Manager
Any new hardware has to be included in PyMoDAQ within a plugin. A PyMoDAQ’s plugin is a python package
containing several added functionalities such as instruments objects. A instrument object is a class inheriting from either
a DAQ_Move_Base or a DAQ_Viewer_Base class and implements mandatory methods for easy and quick inclusion
of the instrument within the PyMoDAQ control modules.
The complete list of available Instrument Plugins is maintained on this GitHub repository.
While you can install them manually (for instance using pip install plugin_name), from PyMoDAQ 2.2.2 a plugin
manager is available. You can open it from the Dashboard in the help section or directly using the command
line: python -m pymodaq_plugin_manager.manager or directly plugin_manager
This will open the Plugin Manager User Interface as shown on figure Fig. 3.3 listing the available plugins packages that can be either installed, updated or removed. It includes a description of the content of each package and the instruments it interfaces. For instance, on figure Fig. 3.3, the selected Andor plugin package is selected and includes two plugins: a Viewer1D to interface Andor Shamrock spectrometers and a Viewer2D to interface Andor CCD camera.
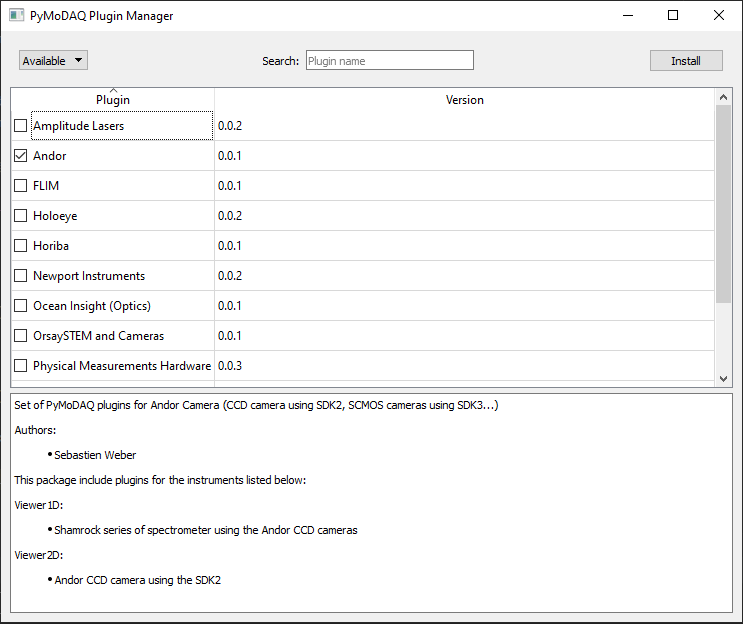
Fig. 3.3 Plugin Manager interface
3.1.6. What about the Hardware
So far, you’ve installed all the software layer managing Instrument control from the user up to the manufacturer driver. This means you still have to install properly your specific hardware. For this, there is no general recipe but below you’ll find some advices/steps you can follow.
3.1.6.1. Serial/GPIB based hardware
In the case where your instrument is controlled using ASCII commands (basically strings), no more steps than plugging you instrument is needed. Just make sur the COM port or GPIB address is correct.
3.1.6.2. Library based hardware
In the case of instruments using a specific manufacturer driver (.dll, .so or .NET libraries) then you could follow these steps:
Install the SDK/dll driver from the manufacturer
Test the communication is fine using the software provided by the manufacturer (if available)
Make sure your OS (Windows, Mac or linux) is able to find the installed library (if needed add the path pointing to your library in the PATH environment variable of your operating system
Install the right PyMoDAQ’s plugin
You should be good to go!
Warning
From Python 3.8 onwards, the way python looks for dlls on your system changed causing issues on existing plugins
using them. So far the right way was to add the path pointing to your dll in the system PATH environment variable.
This no longer works and ctypes LoadLibrary function raises an error. A simple solution to this issue, is to add
in the preamble of my/your plugins this instruction:
import os
os.add_dll_directory(path_dll)
where path_dll is the path pointing to your dll.
Note
Example: if you want to use a NI-DAQ instrument. You’ll have to first install their driver Ni-DAQmx, then test you hardware using their MAX software and finally configure it using pymodaq_plugins_daqmx plugin.
3.1.6.3. Python Versions
As of today (early 2022), PyMoDAQ has been efficiently used on python 3.8 up to 3.9 versions. It’s source code is regularly tested against those versions. Work is in progress to make it working with python 3.10/3.11, but some of PyMoDAQ’s dependencies are not yet available for these versions.