3.8. TCP/IP communication
This section is for people who want an answer to: I have a detector or an actuator controlled on a distant computer and cannot have it on the main computer, do you have a solution?
The answer is of course : YES
For this, you have two options:
install PyMoDAQ to control your hardware on the distant computer
Use a software on the distant computer that can use TCP/IP communication following the rules given below
3.8.1. With PyMoDAQ
From version 1.6.0, each actuator (DAQ_Move) or detector (DAQ_Viewer) module can be connected to their counterpart on a distant computer. For both modules, a TCPServer plugin is available and can be initialized. It will serve as a bridge between the main computer, running for instance a DAQ_Scan module, and the distant one running a usual DAQ_Move or DAQ_Viewer module, see Fig. 3.92. Every parameter of the distant module will be exported on its server counterpart. Any modification of these parameters, either on the server or on the local module, will be updated on either the local module or the server module.
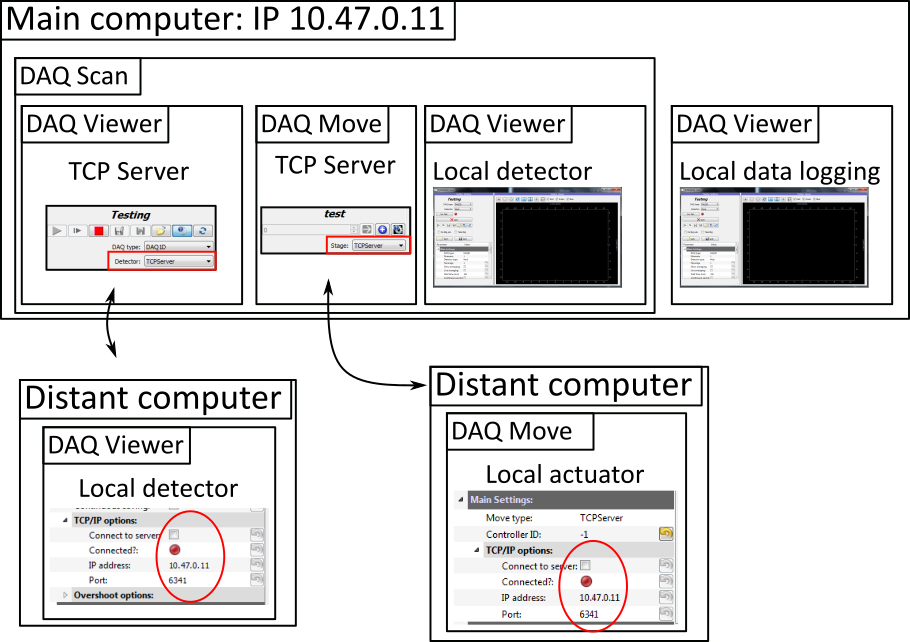
Fig. 3.92 Typical configuration with modules on distant computers communicating over a TCP/IP connection
3.8.2. On another software
The TCP_server plugin can also be used as a bridge between PyMoDAQ and another custom software (installed locally or on a distant computer) able to initialize a TCP client and understand PyMoDAQ’s TCP/IP communications. For instance, at CEMES, we’ve build such a bridge between Digital Micrograph running (eventually) on a distant computer and controlling a specific Gatan camera on an electron microscope. The communication framework used by PyMoDAQ is as follow:
3.8.3. PyMoDAQ TCP/IP Communication protocol
3.8.3.1. Serializing objects
When dealing with TCP/IP one should first transforms object into bytes string (the message) and implement a mechanism to inform the client (or the server) on the length of the message. For each message (whatever the underlying object), the first 4 bytes are coding an integer whose value will be the length of the following message. Using this simple rule allow to send very complex objects.
To make sure there is a robust way to handle this in PyMoDAQ, two objects have been
created, see: ref:tcp_ip_serializer, respectively the Serializer and
DeSerializer objects to convert a python
object to bytes and from bytes to an object.
They both implements specific methods applicable to a given object but also a generic one:
>>> from pymodaq.utils.tcp_ip.serializer import Serializer, DeSerializer
>>> string = 'Hello'
>>> ser = Serializer(string)
>>> print(ser.string_serialization(string))
b'\x00\x00\x00\x05Hello'
In this example, the serializer first send 4 bytes encoding the length of the Hello string: x00x00x00x05 which is the binary representation of the integer 5. Then the binary string is appended: b’Hello.
Similar methods exists for numbers, arrays, list, Axis,
DataWithAxes…
The serialization can also be simplified using the to_bytes()
method:
>>> Serializer(['Hello', 'World']).to_bytes()
b'\x00\x00\x00\x02\x00\x00\x00\x06string\x00\x00\x00\x05Hello\x00\x00\x00\x06string\x00\x00\x00\x05World'
Here the list_serialization() method has been used under the hood.
To recreate back the initial object, one should use the DeSerializer object:
>>> DeSerializer(b'\x00\x00\x00\x05Hello').string_deserialization()
Hello
>>> DeSerializer(b'\x00\x00\x00\x03<f8\x00\x00\x00\x08fffffF_@').scalar_deserialization()
125.1
As you see you have to know in advance which method to apply first. Therefore there is a recipe for each type of objects.
3.8.3.2. Making sure messages are complete:
Message send on a tcp/ip connection can sometimes be send as chunks, it is therefore important to know what will be the length of the message to be sent or to be received. PyMoDAQ use the following methods to make sure the message is entirely send or entirely received:
def check_received_length(sock,length):
    l=0
    data_bytes=b''
    while l<length:
        if l<length-4096:
            data_bytes_tmp=sock.recv(4096)
        else:
            data_bytes_tmp=sock.recv(length-l)
        l+=len(data_bytes_tmp)
        data_bytes+=data_bytes_tmp
    #print(data_bytes)
    return data_bytes

def check_sended(socket, data_bytes):
    sended = 0
    while sended < len(data_bytes):
        sended += socket.send(data_bytes[sended:])
3.8.3.3. Sending and receiving commands (or message):
Serializing and letting know the length of the message is not enough to recreate the initial object. One should add first a command/info on what to expect from the tcp/ip pipe. Depending on the value of this message the application know what deserialization to apply.
The PyMoDAQ client/server control modules are using specific commands as strings that should be either:
- Client receiving messages:
For all modules:
Info,Infos,Info_xml,set_infoFor a detector:
Send Data 0D,Send Data 1D,Send Data 2DFor an actuator:
move_abs,move_home,move_rel,check_position,stop_motion
- Client sending messages:
For all modules:
Quit,Done,Info,Infos,Info_xmlFor a detector:
x_axis,y_axisFor an actuator:
position_is,move_done
The principles of communication within PyMoDAQ are summarized on figure Fig. 3.93 and as follow:
To be send, the string is converted to bytes. The length of this converted string is then computed and also converted to bytes. The converted length is first send through the socket connection and then the converted command is also sent.
For the message to be properly received, the client listen on the socket. The first bytes to arrive represent the length of the message (number of bytes).
For the detail of the python utility functions used to convert, send and receive data see TCP/IP related methods.
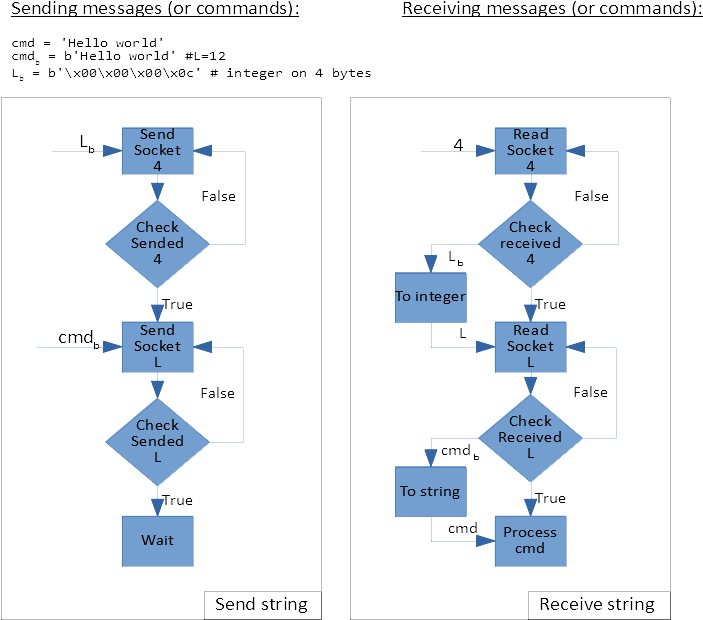
Fig. 3.93 Diagram principle of PyMoDAQ message communication through a TCP/IP socket.
3.8.3.4. Sending and receiving Datas:
Sending or receiving datas is very similar to messages except that datas have a type (integer, float…) and have also a dimensionality: 0D, 1D, … Moreover, the datas exported from plugins and viewers are almost always numpy arrays within a list. One should therefore take all this into consideration. Below is an example of the recipe for serializing/deserializing DataWithAxes objects:
def dwa_serialization(self, dwa: DataWithAxes) -> bytes:
    """ Convert a DataWithAxes into a bytes string

    Parameters
    ----------
    dwa: DataWithAxes

    Returns
    -------
    bytes: the total bytes message to serialize the DataWithAxes

    Notes
    -----
    The bytes sequence is constructed as:

    * serialize the string type: 'DataWithAxes'
    * serialize the timestamp: float
    * serialize the name
    * serialize the source enum as a string
    * serialize the dim enum as a string
    * serialize the distribution enum as a string
    * serialize the list of numpy arrays
    * serialize the list of labels
    * serialize the origin
    * serialize the nav_index tuple as a list of int
    * serialize the list of axis
    """
and obviously the deserialization process is symmetric:
def dwa_deserialization(self) -> DataWithAxes:
    """Convert bytes into a DataWithAxes object

    Convert the first bytes into a DataWithAxes reading first information about the underlying data

    Returns
    -------
    DataWithAxes: the decoded DataWithAxes
    """
    class_name = self.string_deserialization()
    if class_name not in DwaType.names():
        raise TypeError(f'Attempting to deserialize a DataWithAxes flavor but got the bytes for a {class_name}')
    timestamp = self.scalar_deserialization()
    dwa = getattr(data_mod, class_name)(self.string_deserialization(),
                                        source=self.string_deserialization(),
                                        dim=self.string_deserialization(),
                                        distribution=self.string_deserialization(),
                                        data=self.list_deserialization(),
                                        labels=self.list_deserialization(),
                                        origin=self.string_deserialization(),
                                        nav_indexes=tuple(self.list_deserialization()),
                                        axes=self.list_deserialization(),
                                        )
And because control modules send signals with DataToExport objects, there is also a recipe for these.
3.8.3.5. Custom client: how to?
The TCP/Client should first try to connect to the server (using TCP server PyMoDAQ plugin), once the connection is accepted, it should send an identification, the
client type(GRABBER or ACTUATOR command)(optional) Then it can send some information about its configuration as an xml string following the
pymodaq.utils.parameter.ioxml.parameter_to_xml_string()method.Then the client enters a loop waiting for input from the server and is ready to read commands on the socket
- Receiving commands
For a detector:
Send Data 0D,Send Data 1D,Send Data 2DFor an actuator:
move_abs,move_home,move_rel,check_position,stop_motion
Processing internally the command
- Giving a reply
- For a detector:
Send the command
DoneSend the data as a
DataToExportobject
- For an actuator:
- Send a reply depending on the one it received:
move_doneformove_abs,move_home,move_relcommandsposition_isforcheck_positioncommand
Send the position as a
DataActuatorobject
Pretty easy, isn’t it?
Well, if it isn’t you can have a look in the example folder where a Labview based TCP client has been programed. It emulates all the rules stated above, and if you are a Labview user, you’re lucky ;-) but should really think on moving on to python with PyMoDAQ…